Today we will talk about the mistakes that are most often made when building aerated concrete private houses. It would seem, where do mistakes come from? After all, the technology for constructing buildings from aerated concrete is thought out in detail, there is a national standard for them*, leading block manufacturers, provide detailed instructions, and the blocks are easy to lay and process. However wrong decisions when working with aerated concrete blocks are, alas, not uncommon.
The negative consequences of these mistakes are the same as in the case of any incorrectly executed masonry (from solid brick, porous ceramics, foam concrete, etc.). The main problem is cracks that spread throughout the masonry. In principle, the appearance of cracks, even though ones up to 2 mm wide, in external stone walls is not considered a sign of the emergency condition of the building**. However, this can lead to other problems:
- Spread of cracks in exterior and interior finishes. Expensive repairs may be required.
- Freezing of walls and, as a result, increased heating costs
- Deterioration of the microclimate in residential premises.
- In the worst-case scenario, the integrity of the building’s structure is compromised.
The appearance of cracks can be caused by several violations committed by builders.
1. Mistakes when building a foundation

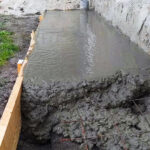
Foundation in the form of a reinforced concrete slab
Aerated concrete masonry is not the most resistant to bending. If the foundation on which it rests is not rigid and stable enough, has significant deviations in geometry, and does not correspond to the type of soil and terrain on the site, then the masonry may bend and crack in some places. To prevent this from happening, you need to competently design and perform the foundation efficiently. When constructing it, the following should be taken into account:
- Features of the soil on the site: the degree of heaving, and the level of groundwater. This information can only be obtained based on engineering-geological surveys. The “neighborhood survey” method is extremely inaccurate and cannot be relied upon.
- The specifics of the terrain: the presence of a slope, and differences in height.
- All loads are on the base. They can only be determined using calculations performed by a professional designer.
Experts recommend installing a reinforced concrete foundation under an aerated concrete house. Shallow tapes or slabs work well, including the very popular today insulated Swedish slab (USP) and insulated Finnish foundation (UFF, tape in combination with insulated floors on the ground). Among others, foundations made of FBS blocks with a mandatory strapping belt along the top row, for example, monolithic, are also acceptable.
2. Mistakes when laying the first row of blocks
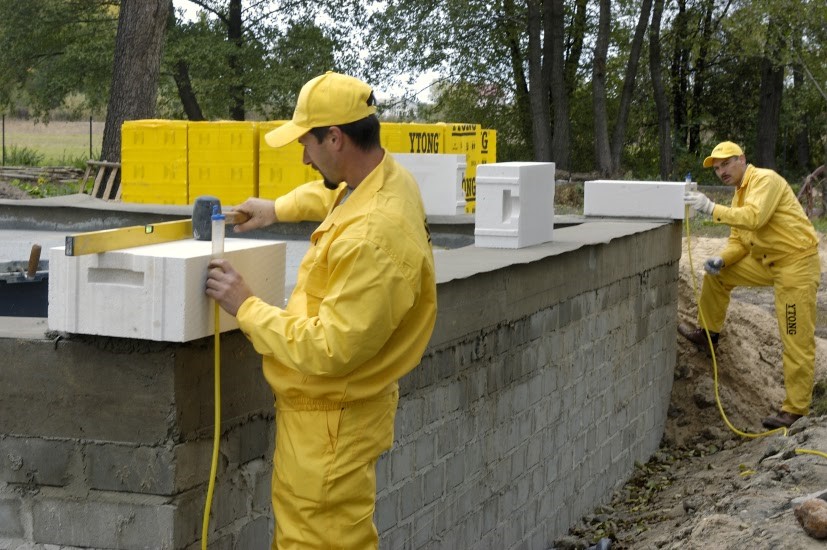
Aligning first-row blocks
The first row of blocks sets the geometry of the entire masonry. If you lay it out insufficiently evenly, with deviations from the required elevation marks, with shifted diagonals, then it will not be possible to correct the mistakes with subsequent rows. On the contrary, mistakes will only increase.
The blocks of the first row are laid on ordinary cement-sand mortar with a thickness of no more than 20 mm. However, this does not mean that the solution can level out strong differences in height on the foundation plane. The permissible deviation from the horizon line is 30 mm. If it is larger, you will have to level the foundation (at the expense of a contractor who did his job poorly) and only then begin laying.
Small differences in height between adjacent blocks in a row are eliminated with a sanding board or plane. The evenness of the masonry is controlled using a laser or optical level.
The first row of blocks must be protected from capillary rise of moisture through the foundation. To do this, waterproofing is provided between the wall and the foundation – bitumen rolls and coating materials, polymer-cement compositions, etc.
3. Mistakes when choosing an adhesive composition

Application of thin-seam adhesive composition
A big mistake is to build aerated concrete walls using conventional cement-sand mortar while obtaining the same joint thickness as in traditional stone walls – up to 12 mm. Such a thick seam leads to significant heat loss from the house, negating the energy efficiency advantage of aerated concrete over other stone materials. Conversely, if you use a special adhesive for aerated concrete, the thickness of the seam will be only 1-3 mm, and heat loss will be minimal.
A regular solution instead of glue is chosen by people who want to save money but incorrectly assess the possible costs. A mortar joint is 4 times thicker than an adhesive joint and therefore costs 4 times more. Moreover, the cost of a regular cement-sand mixture is 2 times cheaper than glue. The result is a double overpayment for a regular solution. Plus higher costs for transportation.
Another mistake is to use cheap glue instead of more expensive, but recommended by the manufacturer blocks. How dangerous is cheap? It may contain a high content of tricalcium aluminate, due to which the composition is not sulfate-resistant. Such adhesive can crumble over time and cause cracking of the masonry along the seam.
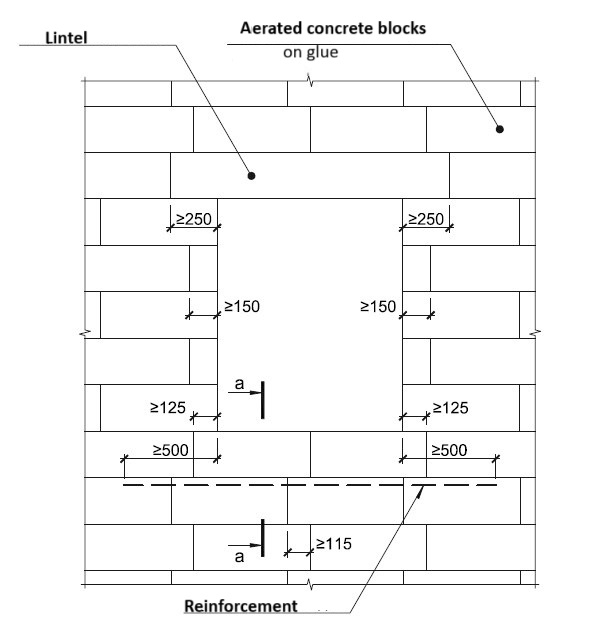
4. Mistakes when tying blocks
The masonry must withstand bending and shearing forces. To do this, you need to correctly tie adjacent rows of blocks. The amount of ligation for blocks with a height of 250 mm must be at least 40% of the height of the block. That is at least 100 mm. The German standards are even stricter – at least 125 mm. Moreover, it is prohibited to use cut elements shorter than 50 mm in masonry. A larger piece of trim can be placed at a distance of 125 mm from the seam between the blocks of the bottom row. Incorrectly performed dressing can lead to the formation of cracks.
5. Mistakes when pairing load-bearing walls and partitions

Connecting walls using flexible ties
It is unacceptable to rigidly mate load-bearing walls with partitions, that is, tie them up with blocks or, for example, connect them with scraps of reinforcement hammered into the walls. Cracks may appear at the site of such a connection. The fact is that load-bearing and non-load-bearing walls are loaded differently and give unequal settlement. To compensate for this, they are connected using flexible connections (anchors) that allow slight deformations.
Block dressing

But load-bearing walls (external and internal) and partitions, on the contrary, must be connected rigidly to each other – due to ligation.
6. Lack of reinforcement in window sill areas

Reinforcement of the window sill area
Contrary to popular belief, masonry made from high-quality aerated concrete does not need to be reinforced. However, window sill areas should always be reinforced, since serious stresses are concentrated in the corners of the openings, and they need to be “relieved.” To do this, reinforcement is installed in the window sill row of sides: it must protrude beyond the boundaries of the opening on each side by a distance of at least 50 cm. Typically, two rods of steel (less often composite) reinforcement with a diameter of 8-10 mm are used. The rods are laid in pre-made grooves and then filled with cement mortar or aerated concrete adhesive. When installing reinforcement in a mortar, the cross-section of the groove must be at least 40×40 mm, and when installing in an adhesive composition, a cross-section of 20×20 mm is sufficient. Each groove is made at a distance of 50-60 mm from the edge of the masonry. It is also permissible to reinforce with basalt or fiberglass mesh.
Window opening design
If the builders forgot about the reinforcement of the window sill areas, then, most likely, the appearance of cracks in the corners of the openings cannot be avoided.
7. Breaks in the armored belt
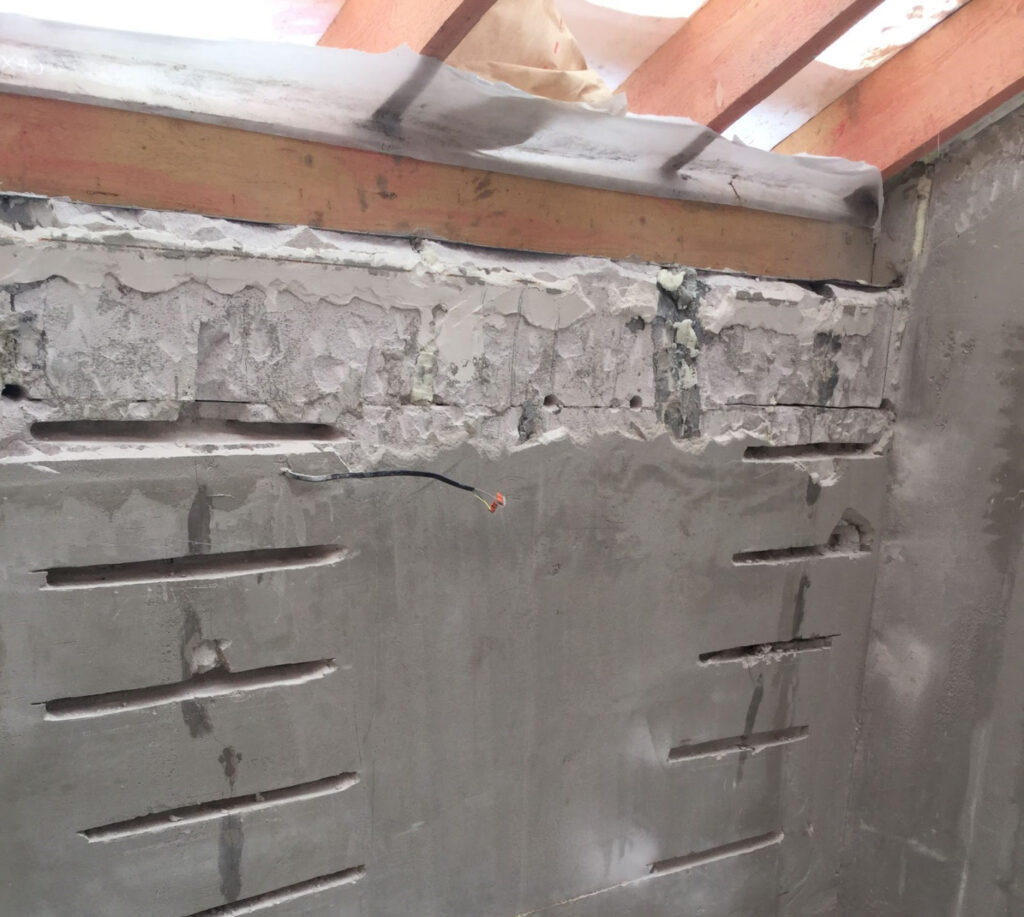
The absence of an armored belt under the roof leads to the appearance of cracks
Builders often forget about the reinforced concrete armored belt, in particular, under the ceiling on wooden beams. Or they make serious mistakes when designing it. For example, in the roof area, an armored belt is provided only under the wooden beam- a beam that serves as a support for the rafters. But they don’t make it along the gables, that is, they don’t close it into an unbroken contour around the perimeter of the building. In this case, the rafters push apart the walls, and cracks appear in the masonry.
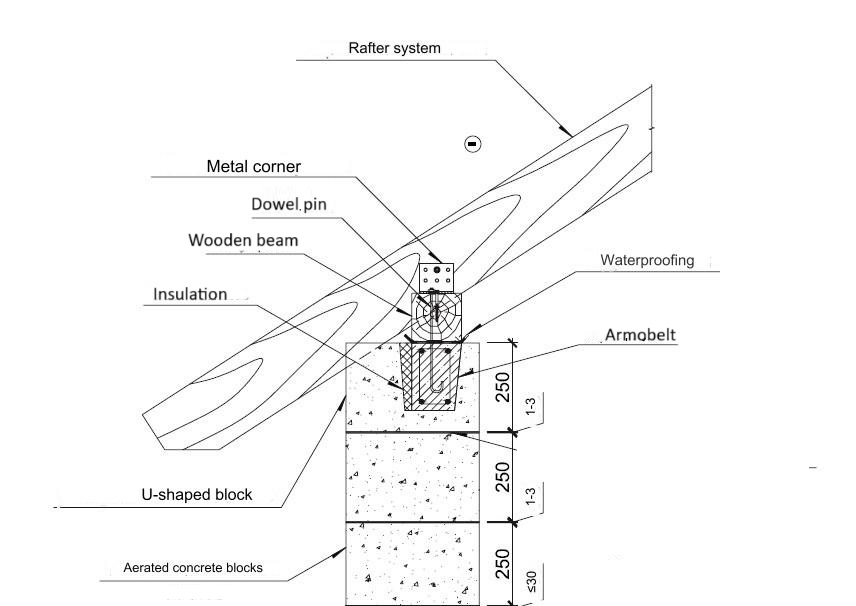
Armobelt under the wooden beam
Conclusion: it is necessary to continue the armored belt along the gables, closing it.

Work to strengthen the structure of the house after its construction
As a last resort, eliminate the expansion by using additional racks under the roof.
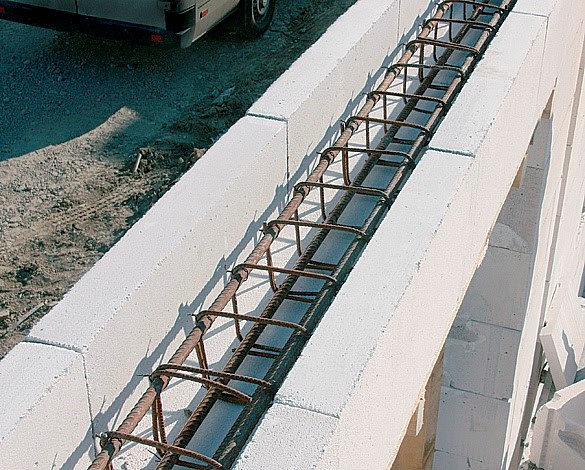
Installation of an armored belt during the construction of a building
An armored belt is needed to distribute uniform load on the walls and foundation of the building. The armored belt is installed in load-bearing walls under the ceilings and roof. Usually, it is a reinforced concrete beam with a cross-section of at least 100×100 mm. This beam is constructed, for example, inside U-shaped aerated concrete blocks or between standard blocks of small thickness (partition). To prevent the house from freezing, the armored belt is covered on the outside with heat-insulating boards (30-50 mm thick), usually made of polystyrene foam.
8. Load-bearing reinforced concrete frame in a low-rise building
Some customers consider aerated concrete to be an insufficiently strong material and therefore, when building a two- or three-story house, they provide a load-bearing frame made of monolithic reinforced concrete, which is filled with aerated concrete. This is an unjustified and irrational complication. The masonry of aerated concrete blocks is a load-bearing wall, and therefore there is no benefit from such a frame. But the harm is tangible. The reinforced concrete structure turns out to be a large-scale cold bridge; it needs to be insulated. Extra concrete work (formwork, reinforcement, mortar) combined with additional insulation is a significant waste of money and time that is completely unnecessary.
9. Vapor-tight exterior finish
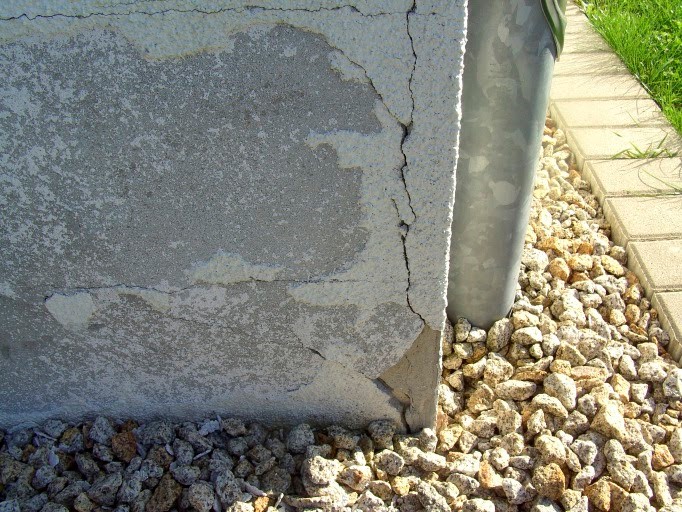
Deterioration of the finish due to the use of vapor-proof plaster
Aerated concrete arrives at a construction site with high humidity. In addition, it allows water vapor to pass from residential premises to the street (the lower the density of the blocks, the higher their vapor permeability). It is a big mistake to “seal” aerated concrete walls with a vapor-tight finish, for example, cement plaster with a density of more than 1300 kg/m3, especially immediately after the completion of masonry work. The walls will not dry out from construction and industrial humidity, which will result in a decrease in the service life of both the aerated concrete itself and the finishing.

Deterioration of the finish due to the use of vapor-proof plaster

Consequences of using high-density cement plaster
In addition, you should not build masonry from facing ceramic bricks close to an aerated concrete wall: brick is less vapor permeable than aerated concrete. When constructing such cladding, leave a ventilation gap of at least 40 mm between it and the wall. Flexible connections made of stainless steel or fiberglass between brick and aerated concrete masonry are required.

Fastening brick cladding to aerated concrete wall
Other popular facing materials are decorative concrete stone and clinker tiles. They also have low vapor permeability, and if they cover more than 25% of the facade area, then it is necessary to provide a ventilation façade with a subsystem for them.

Ventilated façade over aerated concrete wall
10. Vapor-tight thermal insulation
If you need to insulate aerated concrete walls, then it is safest to use vapor-permeable thermal insulation – made of stone or glass fiber. But with polymer thermal insulation materials (EPS, EPS, PPU, PIR), which have very low vapor permeability, everything is more complicated. In principle, they can be used, but with several reservations:
You cannot attach them to fresh, not completely dry masonry.
The thickness of the polymer insulation must provide at least half of the thermal resistance of the enclosing structures. For example, a wall made of D500 blocks with a thickness of 300 mm must be insulated with slabs of extruded polystyrene foam with a thickness of 100 mm or more.
It is advisable to thermally insulate houses with polymer materials, where supply and exhaust ventilation operate constantly, removing excess water vapor from the premises.