The roof is the head of the whole house. This is not a common expression, but the actual state of affairs. Therefore, its construction must be taken seriously: first, understand the theory to clearly understand the whole process, then stock up on the necessary materials, tools, and personal protective equipment. Only after that proceed directly to construction work. Today we’ll talk about it in detail, paying attention to important subtleties and nuances.
What kind of roof can most often be seen on an ordinary country house (let’s not take into account country villas and luxury cottages)? Of course, a gable roof made of slate. The demand for such designs is determined by several factors:
- slate is a relatively inexpensive material;
- slate sheets are often left over from neighbors after roofing work is completed (usually the material is taken in reserve), so they can simply be purchased from the owners at an even more favorable price;
- You can assemble the roof yourself, without the involvement of strangers – the help of one or two people is enough if the sheets are too heavy.
Slate: advantages and disadvantages
Before you go shopping for slate, you should study in as much detail as possible all the necessary information on this material, so as not to be disappointed in your choice in the future.
The advantages of slate are:
- durability and reliability;
- affordable price;
- maintaining high performance in various climatic conditions;
- the material is completely resistant to corrosion and exposure to sunlight;
- in case of fire, the sheets will not support combustion (non-flammable);
- Careful dismantling will allow the slate to be reused.

Disadvantages of slate:
- the mass of the sheet, which makes it impossible (or significantly complicates) installation work by one person. Depending on the type of profile, 1 sheet of slate weighs from 23 to 35 kg;
- complete tightness is not ensured at the points of contact (joint) of sheets;
- asbestos, which is part of the slate, is considered a hazardous substance to human health (Asbestos slate is banned in some countries. You can choose non-asbestos slate).
However, all of the listed disadvantages are not critical, since their influence can be quite easily smoothed out. For example, the heaviness of the sheets can be dealt with by involving additional assistants in the work process, and leaky areas can be additionally sealed with sealant.
I would also like to dwell on the last drawback of slate – the content of asbestos cement in it. Yes, this substance can cause various respiratory diseases. However, for this, it needs to get inside the body. That is, in its normal state, a slate sheet does not pose the slightest danger to humans. A potential threat comes from manufacturing (this risk is not relevant to our case) and processing of the material, for example, sawing. But even here you can quite simply avoid unpleasant consequences – when cutting slate, always stand on the leeward side and be sure to use a respirator.
Attention! It is better to choose an asbestos-free slate.
Slate roof installation
So, we are faced with the task: of building a gable slate roof. Let’s look at the process in detail using the example of building a roof on a building of four walls – without floor slabs or a concrete pad.
The first stage is the installation of support beams
The work itself can be divided into several substages.
Preparatory process. It is recommended to initially coat the beams with an antifungal compound, which will protect the wood during operation. Those places that will be in contact with the walls should be additionally secured with roofing felt. Considering that the first and last beams will lie completely on the stone, they should be covered with protection along their entire length. This can be done quite simply with the help of a construction stapler, which will securely fix the roofing material on a wooden surface.
Installation. The beams are mounted parallel to each other and at right angles to two randomly selected walls (along or across the room).
Securing supporting elements. To do this you will need a hammer drill, small pieces of durable reinforcement, and binding wire. The procedure looks like this:
- under each beam, between the last and penultimate row of stone, a through hole is drilled;
- reinforcement is inserted into it – its length should be enough for the ends to peek out a little;
- using a knitting wire, the beams are secured to the reinforcement;
- the distance between the wooden beams should not exceed 1 m. If the length of the walls does not allow installing all the beams taking into account this condition, then it is recommended to reduce the length of the gap so that all elements are located at the same distance from each other. One should take into account the fact that the first and last beams are mounted along the outer boundaries of the walls.
It often happens that the installed elements (beams) have different lengths. What to do? Everything is quite simple :
- Using a tape measure, mark the desired size on the outer beams;
- The cord (string, fishing line) is pulled along the line of marks;
- Everything that goes beyond the marked boundaries is cut off.
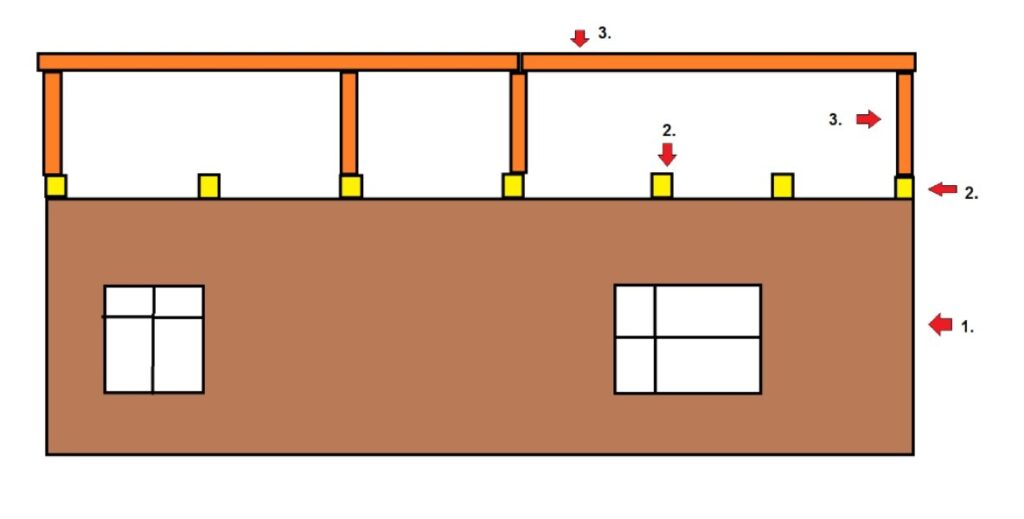
Actually, the whole process is clearly presented in the diagram:

Legend:
- Support beams.
- Walls of the building.
- Thread for controlling the size of installed bars.
- Parts of beams that need to be cut.
The second stage – installation of rafters
Rafters are load-bearing structural elements, that is, those that are responsible for the rigidity, strength, and stability of the roof. The question immediately arises – how to install the rafters in the same plane relative to each other? The easiest way to do this is with the help of additional systems that are erected temporarily and dismantled after all work is completed.
How to do it:
- cut off several beams of the same size, the length of which will be slightly less than the planned total height of the internal part of the roof being erected;
- secure them to the outer support beams, as well as to several other similar elements. This is necessary so that the future roof ridge does not have a deflection;
- place a beam on the beams and secure it.
It turns out something like this:
Legend:
- House walls.
- Support beams.
- Temporary structure to facilitate rafter alignment.
Now you can install the rafters. The bottoms of the beams are cut to the required angle and secured to each support using several long nails. It is not necessary to trim the upper part – just attach the elements, secure them with nails, and only then remove all excess. At this stage, the rafters are held up, for the most part, by our temporary structure. Before removing it, you will need to install additional permanent fasteners. The most convenient option will be the one presented in the diagram below – it allows you to use the attic space more efficiently:
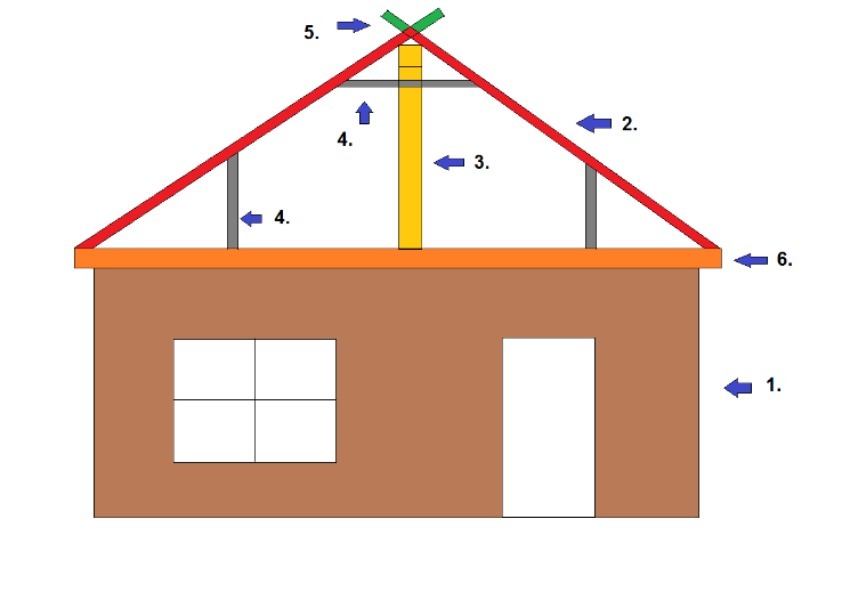
Legend:
- Walls of a country house.
- Rafters.
- Design for temporary fixation of rafters.
- Permanent rafter fixation system.
- The parts that will need to be cut after all the elements are secured.
- Support beam.
The third stage – insulation and lathing
Isolation. It is an important element in the overall design of a slate roof, given the fact that there may be no tightness at the joints of its sheets. Of course, slate does not allow water to pass through, but it can absorb it like a sponge, spreading moisture onto the wooden structural elements, into the attic and further down into the living quarters of the country house. Insulation, which is spread using a certain technology, will help to avoid this:
- the insulating material is laid perpendicular to the installed rafters;
- work begins from the bottom row, gradually moving up. With each subsequent row, a slight overlap should be made on the previous layer of laid insulation;
- It is best to use a construction stapler to secure the material.

Lathing. Of course, you can cover the entire roof with wood, but it will be enough if there are four boards under one sheet of slate. The standard height of this material is 175 cm, that is, the sheathing elements should be located at a distance of no more than 45 cm from each other. For fixation, nails are usually used to secure the sheathing board to the rafters.
The final stage – installation of slate
First of all, you should tighten the control cord, which will mark the boundaries of the bottom row of stacked sheets. Of course, you don’t have to do this, but there is always the possibility of some displacement of the slate, and the result may not be the most pleasant picture. The material should be installed in rows – from bottom to top. The second sheet of slate is superimposed on the first (exactly one wave) and so on. To secure the sheets, you will need special roofing nails – they have a significant length and an enlarged head. Sometimes there is also a rubber gasket, but this is very rare.
Slate fastening technology:
- the first row of sheets is initially secured only to the two lower nails, which are driven into the first row of the sheathing;
- the second row of slate is laid overlapping in such a way that it is possible to drive fasteners simultaneously into the fourth board of the sheathing, as well as into the sheets of the first and second rows;
- This method is used to install all the material up to the top of the roof.
There is a possibility that the outermost and top sheets of slate will have to be trimmed. To do this, you will need to take a grinder with a stone disc and also wear a respirator to protect your lungs from dust getting into them.

To complete the roof installation process, you will need to do two more things:
- Install the skate. Typically this element is made of metal, so to secure it you will need special screws with a large head and a screwdriver.
- Bend the roofing nails. This step is also very important. If this is not done, then the wind can gradually loosen the fastening and tear off the sheets.
That’s it, the slate roof is ready. You can wipe the sweat from your forehead and proudly admire the creation of your hands. Have you ever built a roof with your own hands? What was the most difficult thing and how did you overcome the difficulties?